2019.02.09: 이 포스팅은 WP 4를 기준으로 만들어졌던 것으로 WP 5에서는 테스트되지 않았습니다.
Intro
결국 개인정보 이슈가 제일 큰 문제이다. 검색을 해보면 알겠지만, 완벽한 보안이란 없다는 점이 특히 의료정보와 관련되서는 많은 문제들을 발생시키게 된다.
아무튼 그 중에 대안으로는, 최소한의 정보만으로, 설령 그 데이터가 유출되더라도 알수 없게 하는게 최선이지 않을까.
주민등록번호 암호화
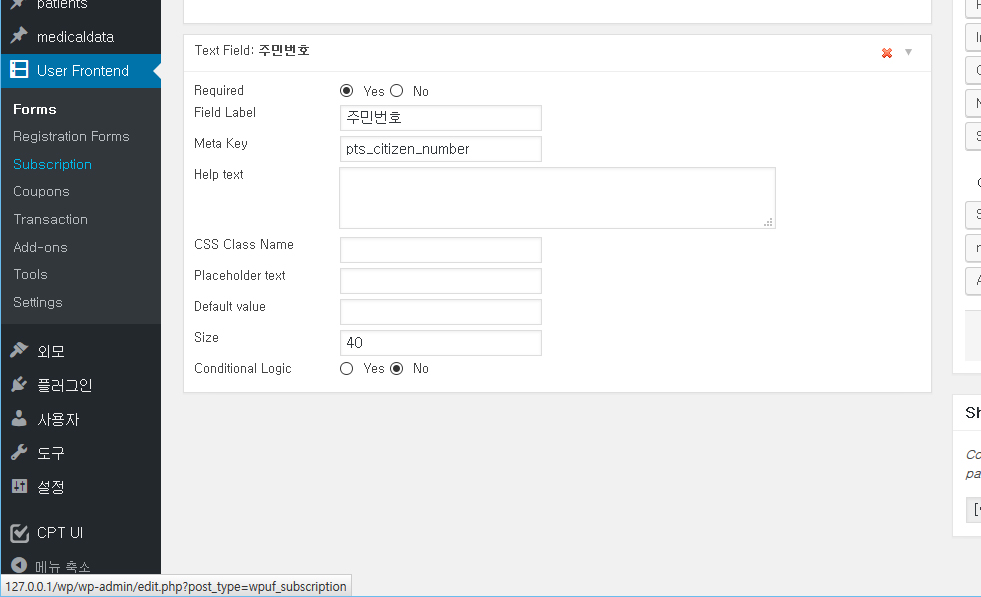
환자 등록창 다시 보기(WPF)
일단 주민등록번호를 입력받을 수 있게 환자 등록창을 구성한다. (이미 첫번째 포스팅에서 구현을 해긴 했었음)
#1. Frontend에서 pts_citizen_number라는 metakey를 갖는 text field를 구성
SHA와 hooking(function.php)을 이용
#2. 1편에서 이용했던 hooking함수에 다음 코드를 넣는다. 당연한 얘기지만 함수 이름을 다른것으로 각각 써도 된다.
function wpufe_update_record_pid( $post_id ) {
    if ( isset( $_POST['pts_rec_id'] ) ) {
        update_post_meta( $post_id, 'pts_rec_id', $_POST['pts_rec_id']);
    }
    if ( isset( $_POST['pts_citizen_number'] ) ) {
        update_post_meta( $post_id, 'pts_citizen_number', hash("sha256",$_POST['pts_citizen_number']."junn279"));
    }
}

add_action( 'wpuf_edit_post_after_update', 'wpufe_update_record_pid' );
add_action( 'wpuf_add_post_after_insert', 'wpufe_update_record_pid' );
pts_citizen number를 처리하는 함수로는 sha256을 이용했다. 이부분은 이전 링크들 참조.
Password Hashing and Encryption In PHP; MD5, SHA1, SHA256, BCrypt
http://www.openeg.co.kr/329
그냥 넣기 그래서 “junn279″라고 비밀번호 뒤에 붙여줬다. 이 부분은 추후에 환자별로 바꿔서 넣을 수도 있다. 그 예제는 위의 링크에 있으니 참조할 것. 목적은 조금이라도 자료가 유출되었을 때 분석되는 시간을 늘리게 함에 있는 것이다.

phpmyadmin으로 보면 암호화된 주민번호가 저장되었다.
결국 핵심은 주민번호 자체를 저장하는 것이 아니라, 암호화된 값을 저장한다는 것, sha256이 단방향 체계이기 때문에 이 값을 뒤집어볼 수 없다. 우리는 input을 확인할 수만 있는 것이다.
이로서 암호화 하기는 끝
주민등록번호를 이용한 검색
검색창 만들기
테마 폴더의 searchform.php 를 열어서 기존의 search_form을 복사해서 나만의 폼을 하나 더 만든다. 이건 환자 검색 전용으로 쓸 목적이다.
거기에 추가한 것은 이 코드 하나다. 이를 통해 검색을 바꿔볼 것이다.
이것을 굳이 ‘검색’으로 한 목적은 따로 없다. 두번째 포스팅의 codex를 이용할 수도 있을 것 같다.
검색 관련 쿼리 수정(function.php)
#4. 아래 링크를 보면 custom searching에 대한 모든 것이 되어있다.
This file contains hidden or bidirectional Unicode text that may be interpreted or compiled differently than what appears below. To review, open the file in an editor that reveals hidden Unicode characters.
Learn more about bidirectional Unicode characters
| /** | |
| * [list_searcheable_acf list all the custom fields we want to include in our search query] | |
| * @return [array] [list of custom fields] | |
| */ | |
| function list_searcheable_acf(){ | |
| $list_searcheable_acf = array("title", "sub_title", "excerpt_short", "excerpt_long", "xyz", "myACF"); | |
| return $list_searcheable_acf; | |
| } | |
| /** | |
| * [advanced_custom_search search that encompasses ACF/advanced custom fields and taxonomies and split expression before request] | |
| * @param [query-part/string] $where [the initial "where" part of the search query] | |
| * @param [object] $wp_query [] | |
| * @return [query-part/string] $where [the "where" part of the search query as we customized] | |
| * see https://vzurczak.wordpress.com/2013/06/15/extend-the-default-wordpress-search/ | |
| * credits to Vincent Zurczak for the base query structure/spliting tags section | |
| */ | |
| function advanced_custom_search( $where, &$wp_query ) { | |
| global $wpdb; | |
| if ( empty( $where )) | |
| return $where; | |
| // get search expression | |
| $terms = $wp_query->query_vars[ 's' ]; | |
| // explode search expression to get search terms | |
| $exploded = explode( ' ', $terms ); | |
| if( $exploded === FALSE || count( $exploded ) == 0 ) | |
| $exploded = array( 0 => $terms ); | |
| // reset search in order to rebuilt it as we whish | |
| $where = ''; | |
| // get searcheable_acf, a list of advanced custom fields you want to search content in | |
| $list_searcheable_acf = list_searcheable_acf(); | |
| foreach( $exploded as $tag ) : | |
| $where .= " | |
| AND ( | |
| (wp_posts.post_title LIKE '%$tag%') | |
| OR (wp_posts.post_content LIKE '%$tag%') | |
| OR EXISTS ( | |
| SELECT * FROM wp_postmeta | |
| WHERE post_id = wp_posts.ID | |
| AND ("; | |
| foreach ($list_searcheable_acf as $searcheable_acf) : | |
| if ($searcheable_acf == $list_searcheable_acf[0]): | |
| $where .= " (meta_key LIKE '%" . $searcheable_acf . "%' AND meta_value LIKE '%$tag%') "; | |
| else : | |
| $where .= " OR (meta_key LIKE '%" . $searcheable_acf . "%' AND meta_value LIKE '%$tag%') "; | |
| endif; | |
| endforeach; | |
| $where .= ") | |
| ) | |
| OR EXISTS ( | |
| SELECT * FROM wp_comments | |
| WHERE comment_post_ID = wp_posts.ID | |
| AND comment_content LIKE '%$tag%' | |
| ) | |
| OR EXISTS ( | |
| SELECT * FROM wp_terms | |
| INNER JOIN wp_term_taxonomy | |
| ON wp_term_taxonomy.term_id = wp_terms.term_id | |
| INNER JOIN wp_term_relationships | |
| ON wp_term_relationships.term_taxonomy_id = wp_term_taxonomy.term_taxonomy_id | |
| WHERE ( | |
| taxonomy = 'post_tag' | |
| OR taxonomy = 'category' | |
| OR taxonomy = 'myCustomTax' | |
| ) | |
| AND object_id = wp_posts.ID | |
| AND wp_terms.name LIKE '%$tag%' | |
| ) | |
| )"; | |
| endforeach; | |
| return $where; | |
| } | |
| add_filter( 'posts_search', 'advanced_custom_search', 500, 2 ); |
이를 적절히 수정한다.
$list_searcheable_acf = array(“pts_citizen_number”);
일단 이 부분은 이렇게 수정하는데, 결국 나는 pts_citizen_number라는 meta_key 값만 추가로 찾을 것이다 라는 이야기
advanced_custom_search 함수의 셋째줄을
if ( empty( $where ) || $_GET[‘option’] != ‘citizen_number’ )
return $where;
이렇게 해주면, 아까 hidden form으로 넘긴 값이 있을때만, 이하의 코드들로 custom searching을 해주겠다는 이야기
그 아랫줄을
$terms = $wp_query->query_vars[ ‘s’ ];
// add encyrpty
$str = $wp_query->query_vars[ ‘s’ ];
$terms = hash(“sha256″,$str.”junn279”);
이렇게 해주면 $terms을 그냥 넘어온 input값이 아닌 암호화시킨 값으로 대조해주겠는 것이다.
그럼 결과는
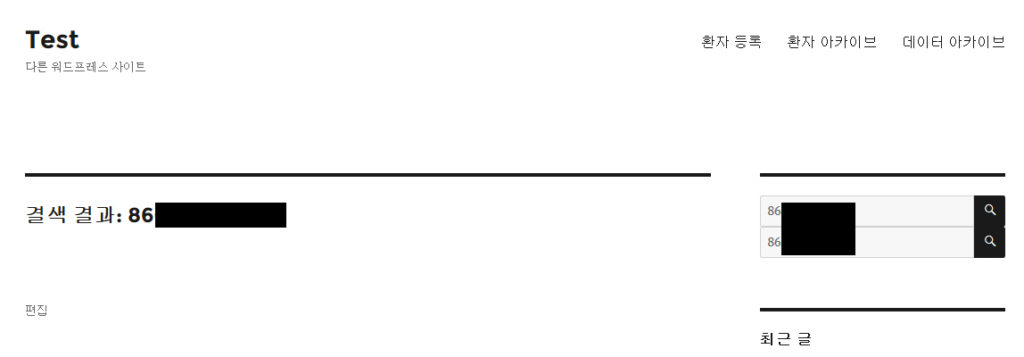
검색되는 레코드가 있다. (UI는 건드리지 않아 엉망이다…이부분은 다음 편에 다루기로)
그리고 편집을 누르면
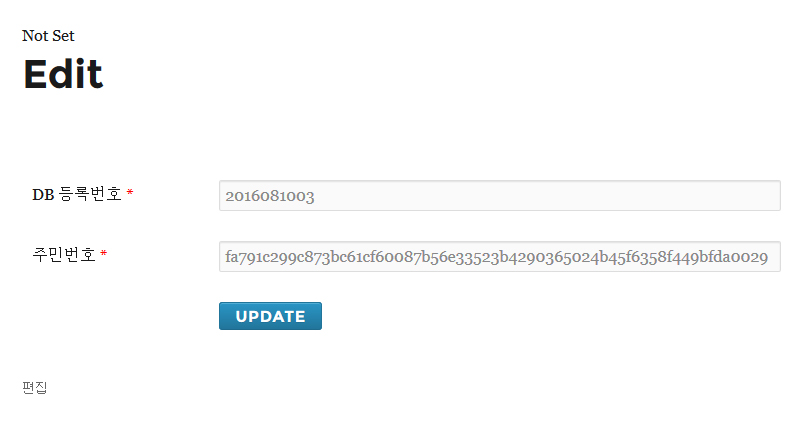
암호화되어있는 주민번호가 등장한다.
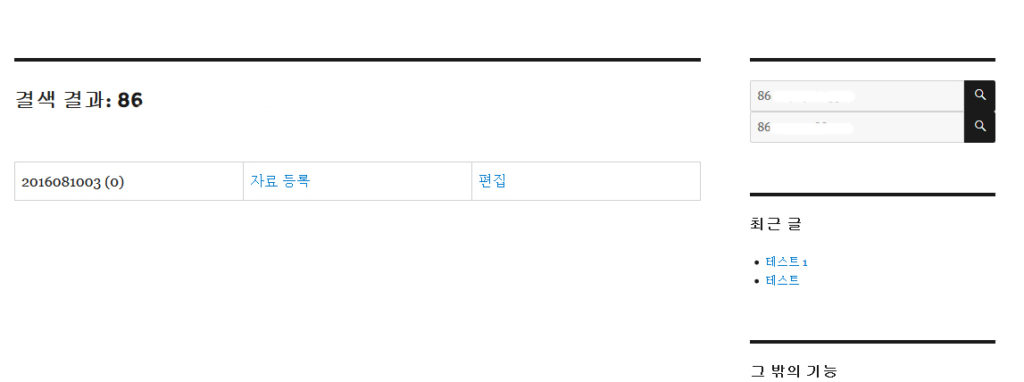
잘 찾아졌다.
위 화면 우측에 검색창이 두개있다. 위에것과 아래것은 결과가 완전히 다르다. 당연하겠지만, 위에 것으로 하면
if ( empty( $where ) || $_GET[‘option’] != ‘citizen_number’ )
return $where;
여기에서 걸리기 때문에 원래의 wordpress searching이 되는 것이기 때문이다.
환자 찾기 페이지 UI 수정
search가 이루어진 후에는 테마 폴더의 search.php 에서 그 결과를 출력한다.
그 페이지의 문구를
get_template_part( ‘template-parts/content’, ‘search’ );
에서
get_template_part( ‘template-parts/content’, ‘search_citizen’ );
로 바꾸고,
template-parts 폴더의 content-search.php를 같이 search_citizen.php로 복사를 해서 이전의 content-patients.php 처럼 만들어주면 작업은 완료된다.
혹은 애초에 contents-patients.php를 부르면, UI가 같을 경우라면 파일을 두개 중복해서 둘 필요가 없게 될 것 같다.
다음 포스팅에서는 & References
#1. pts_id 와 pts_rec_id가 동일한 data만 추출하는 것. 그래야 그 환자의 자료만 볼 수 있을테니까.
#2. 레코드 삭제버튼
#3. 환자 데이터를 삭제할때 하위 레코들도 함께 삭제하기(귀찮을 것 같다)
#4. 환자등록시 주민등록번호를 받아서 암호화 시켜 저장하고, 주민등록번호로 환자 record를 찾을 수 있게 하기.
#5. 환자ID를 통한 환자 데이터 세부조회, 날짜별 정렬, 글쓴이 표시 등등
#6. DB를 엑셀(xml)로 export하기
https://paulund.co.uk/access-database-outside-wordpress
http://wordpress.stackexchange.com/questions/26254/how-to-include-wp-load-php-from-any-location
https://paulund.co.uk/creating-custom-tables-wordpress-plugin-activation